Paula's Pie Project Blog

52 different pies in 52 weeks

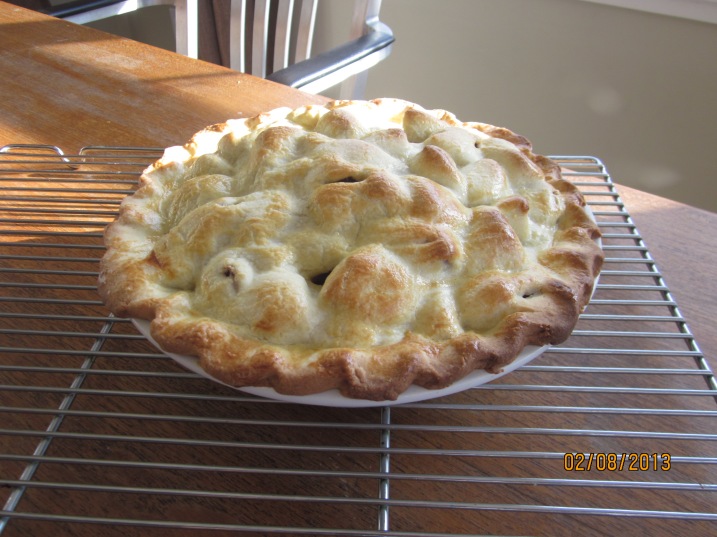
Pie #59- Pear (again!) February 10, 2013

Yes, I have proclaimed that I would make 52 new pies this year, but this pie from the 2010 Pie Project is definitely worth mentioning again in the 2013 edition.

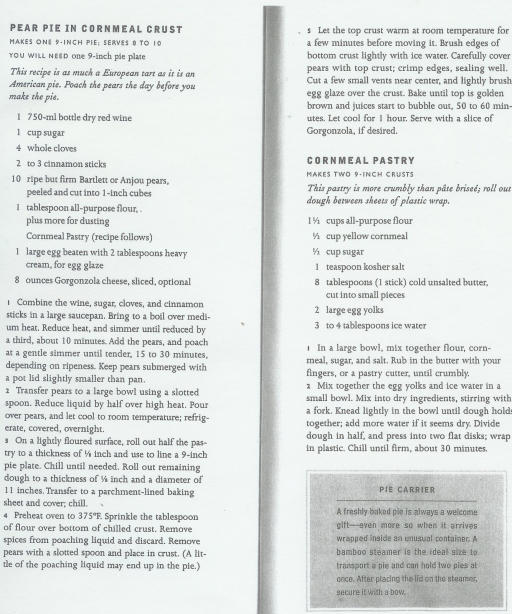
Pie #6- Pear was by far the “people’s favorite” pie of the 2010. Served in a cornmeal crust with a small piece of Gorgonzola cheese, this pie will knock your socks off.

Martha Stewart recipes always tend to be a bit over the top for me, but this one is pretty bones-bare-basic. Although it does require a bit of pre-planning with soaking the pears overnight in a wine reduced liquid, it is not very difficult to make, so even you can wear Martha’s apron this time.

Pear Pie and Cornmeal Crust recipes

I have probably have made this same pie over a dozen times now and it never disappoints. My boys even know and revere the special status of the pear pie. It usually comes out noteworthy occasions. Last night was one of them. I made this one for the boys’ school fundraiser. It was the only pie among the many desserts in the sweet shop auction. Hopefully,  who ever bought it enjoyed it as much as we do!

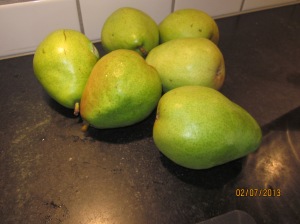
Pretty pears

Pretty pears

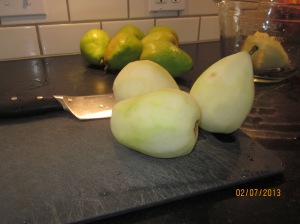
Peeling off the skins

Peeling off the skins

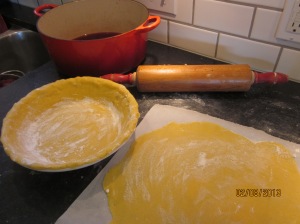
Pie dough ready to go!

Pie dough ready to go!

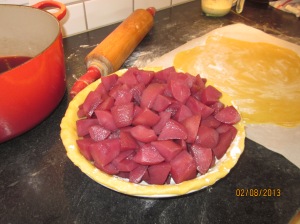
Wine soaked cut-up pears in the pastry shell

Wine soaked cut-up pears in the pastry shell

Pie #59- Pear (again)

Pie #59- Pear (again)

Personal Notes:

  • Yes, this is my favorite pie to make. Its ease of assembly and it’s delectable flavors, keep this as my personal front-runner.
  • I love the wonderful flavors you get in every bite of this pie. The firm, wine-soaked pears have a hint of clove and cinnamon. The sweet cornmeal crust is coarse and crumbly. Add a little bite of  Gorganzola cheese and a nice Sauternes glass of wine and you have got yourself a little slice of heaven on a plate!
 

Pie #52- Eggnog Chiffon December 29, 2010

Here it is …the official GRAND FINALE of the 2010 Pie Project…Pie #52- Eggnog Chiffon! 

In the spirit of the holidays, this pie was originally made with my husband, Travis and my “foodie” friend, Sharon in mind both of whom LOVE eggnog.  I personally do not care for the taste (at least the kind of eggnog you find in the grocery store), but let me tell you, THIS is not your grocery store eggnog pie.  This is home-made eggnog at its finest.  I never knew I liked the stuff until I tasted a slice of this pie.

Once again I have called upon the author of Pie, Ken Haedrich, to supply me with his recipe for eggnog chiffon pie.  So far, nothing from that cook book has disappointed me or my lucky tasters.  (There are 11 out of 52 recipes from my blog that have come from his book.  Considering there are over 300  recipes in Pie, I just barely put a dent in it.)


Personal Notes

  • The pie construction is a little on the labor intensive side, but it is well worth it if you want to impress your friends and family.  The only baking involved is the baking of the graham cracker crust because the rest of it is cooked on the stove top and chilled in your refrigerator.
  • This was my first successful graham cracker crust from Ken Haedrich!  And the funny thing is that I screwed up on the amount of the butter.  The recipe above calls for 1/4 cup (or 1/2 stick) of butter and I accidentally put in a 1/2 cup or a WHOLE stick of butter.  I am convinced that the additional butter is why the crust actually stayed together this time around.  It hardened when it baked and did not fall apart and crumble when I served it.
  • A BIG thanks to Jim and MJ, Scott and Angie, Sharon and Greg, Theresa and David, Ann and Jerry  AND of course, Travis for being my official tasters for this one.  It is so nice to be able to pick your friends and share Christmas with you all.  You are our family away from home.
  • Kim and Gaynam, we are missing you!  I froze a piece and have saved it for you for when you return from your trip.
  • The pie was smooth and creamy with no eggnog (rum) after taste.  The crust was perfectly sweet, yet crunchy.  My pie-o-meter rating = 9.5 
  • Is this really the end of the end?  ….to be continued… 


Pie #51- Coffee Toffee December 22, 2010

December is a big birthday month for our family- both nuclear and extended.  I have three nephews with December birthdays.  Last week we celebrated my son Oliver’s 9th birthday and this week is my dear husband’s.

So selection for this one was easy.  It was Travis’ call.  The newly donned 42-year-old got to pick out what pie he wanted for his big day.  Coffee and toffee was his second choice after he quickly blurted out “peach”. 

(I already made a peach pie for the project and because of my no repeat rule, couldn’t do it again.  Plus it is pretty impossible to find fresh peaches in Boise this time of year.  His beloved peach pie (Pie #32) was made back in late July when I was in Ohio for our summer trip.  The poor guy never even got a slice of his proclaimed favorite since by that time he returned to back to Boise.)

So coffee and toffee it is.  The recipe is actually a combination of two together- one for the actual pie and the other for the toffee sauce topping.   I started with the coffee toffee pie recipe from Grouprecipes.com and while in the midst of my baking, I realized my expectations for the toffee portion of the pie were not going to be met. (There was no toffee sauce or toffee topping included in this pie.)  The name Grouprecipes.com gave theirs is false advertising.  They should drop the “toffee” portion and rename the recipe “Coffee Pie” or “Coffee Mousse Pie”.  Either would be a better description. 

So now fully immersed into the baking of the “coffee pie”‘, I had to come up with the toffee portion to satisfy my husband’s request.  A quick google search brought me to Allrecipes.com where I found this simple toffee sauce recipe.  I combined the two recipes and now I had the perfect birthday gift!


COFFEE TOFFEE PIE-

http://www.grouprecipes.com/11655/coffee-toffee-pie.html

Crust-

  • 1 -1/2 c. flour
  • 3/4 c. finely chopped pecans
  • 1/4 c. brown sugar
  • 1 sq. bittersweet chocolate, finely chopped
  • 1/3 c. butter at room temperature
  • 1 tsp. vanilla
  • 2-3 Tbps. cold water

Preheat oven to 350. Lightly butter a 10 inch springform pan. Cut waxed paper to fit bottom. Brush or rub with butter; then place buttered side up. Using fork, stir flour, nuts, sugar, chopped chocolate in bowl. Stir in butter and vanilla. Add 2 T water and mix until crumbly. If too dry, add 1 more Tblsp. of water. Turn into springform pan. Press into bottom and up sides. Bake 18-20 minutes. Cool on rack. Do not remove sides.

 Filling-

  • 2 sq. bittersweet chocolate
  • 1 Tbsp. instant coffee powder
  • 3/4 c.unsalted butter at room temperature
  • 3/4 c. granulated sugar
  • 3 eggs

Cut chocolate into coarse pieces. Place chocolate and instant coffee in saucepan over very low heat. Melt, stirring frequently, and remove from heat when small pieces of chocolate are still visible, about 5 min. Then, stir until smooth.In mixing bowl, beat butter with electric mixer until very creamy. Gradually add sugar, beating until light and lemon colored. Beat in cooled chocolate mixture until combined. Then beat in eggs, one by one, beating well after each addition. Pour into cooled crust and refrigerate until cold at least 1 hour or up to 1 day.

Topping

  • 2 Tblsp. instant coffee powder
  • 500 ml container of whipping cream
  • 1 tsp. vanilla
  • 2 Tblsp. coffee liqueur (Kahlua or Tia Maria)
  • 1/4 c. sifted powdered sugar

Add whipped cream topping no more than 2 hours before serving. Stir instant coffee with cream, vanilla and liqueur in medium bowl. Beat until soft peaks form. Gradually beat in icing sugar. Spoon on top of pie and swirl in mounds covering entire surface. (DRIZZLE TOFFEE SAUCE ON SIDES AND TOP OF PIE).  Top with chocolate curls or grated chocolate. Serve right away or up to 2 hours. Gently remove sides from pan.

TOFFEE SAUCE *

http://allrecipes.com//Recipe/toffee-sauce/Detail.aspx

Ingredients

  • 1/4 c. butter
  • 1 c. brown sugar
  • 1/2 c. light corn syrup
  • 1 Tbps. water
  • 1/2 can sweetened condensed milk
  • 1/2 tsp. vanilla extract

Directions-

In a medium saucepan over medium heat, melt butter. Stir in brown sugar, corn syrup, water and condensed milk. Cook and stir until thickened. Remove from heat and stir in vanilla.

*(The recipe shown has been cut in half from the original amounts.  There will still be plenty of sauce left over!) 


Personal Notes:

  • As far as the crust, it was different from the usual due to the addition of the finely grated chocolate, chopped pecans and brown sugar, but yet it baked similarly to a typical basic flaky crust.  No rolling was needed.  Instead the soft, pliable dough was pressed  into the buttered pan.  A springform pan was required so be prepared for that and a food processor made the crust preparation VERY easy.  (I won’t be making this at Mark and Dalia’s house ever since they have neither a springform, nor a food processor.  But Mike and Molly, I will be happy to make this for you as long as you let me eat soup, drink libations and watch Ohio State football games in your basement.)
  • The filling tastes just like chocolate mousse, but with a hint of coffee.  Who buys instant coffee these days, anyway?  I think I called four or five neighbors to “borrow” a few teaspoons of the stuff and I was mocked for even asking!  Finally, I broke down, went to the store and bought the small jar of Folgers.  It will now sit on my shelf for ten or so years or until I make another coffee related dessert.
  • The topping was a whipped cream, but just tastier than your average since it has the addition of Kahlua, coffee and a bit of powdered sugar.  Note to self, the recipe does say to add this topping on and serve immediately or within two hours.  I did serve immediately, but then after consumption I stuck the remaining pie in the freezer.  The pie remained in perfect condition (until we went for our second helping hours later) and the whipping cream did not “melt” like it tends to do after time.
  • The toffee sauce was a great addition to the pie.  I drizzled it over the sides and top after it had cooled.  And for the grand finale, I added  grated chocolate rather than the chocolate curls on top. 
  • I know I have given some pretty high marks to some of my previous pies, but this one is seriously worth a 10 plus, plus!  As a coffee, chocolate and toffee lover- tt is TRULY FANTASTIC and goes down in history books as being one of my personal favorites this year.  I would definitely make this again…Folgers instant coffee…here I come!!!!
  • Happy Birthday, Travis!  Hope this year is even better than the last, although without the pie project, I am not sure how I can top it!?!? XOXOXOXO


Pie #50- Cookie Dough Ice Cream December 15, 2010

My second son Oliver turned 9 last Friday and as the birthday boy he was given the choice between birthday cake or pie…. you guessed it!  Gotta love that kid!

I have been saving this recipe for a while.  I found it this summer while paging through a Real Simple magazine.   Ollie immediately went for it when he saw the photo.  His only problem is that he doesn’t care for mint chocolate ice cream.  I can relate.  I don’t either.  No problem….I knew we would find another one he liked.

Here’s the recipe.


Personal Notes:

  • For the record, their pie looks WAY better than mine.
  • Obviously, I used cookie dough ice cream instead of mint chocolate chip.  It is the birthday boy’s favorite.  I suspect you will do the same when you make yours.
  • Three ingredients = my simplest pie.  This one goes together fast too!  It ranks up there with the Banana Split Pie as being on the VERY, VERY EASY side.
  • Simple, yet I screwed it up.  It would have helped if I would have thoroughly read the instructions.  My pie crust did not look like theirs because I did not press the mixture 1″ up the sides of the springform pan.  After realizing my mistake, I underlined it so you don’t make the same mistake.
  • I liked the rice crispy crust because it added a nice crunchy texture to the ice cream bite.  This pie rates a 10 for ease of assembly.  For taste, I give it an 8.


 Believe it or not, I do make other desserts in the kitchen!  It is Christmas cookie time!   


Pie #49- Pies from Mrs. Taylor’s Classes December 8, 2010

Here you go Swanson Middle Schoolers- Here’s your own blog post with all of your photos from your pie making class on Monday.

Audience you cast your vote (make a comment) on who made the best looking pie….

My vote goes to….   (scroll to bottom)

1st P/Kitchen 1


1st P/Kitchen 2


1st P/Kitchen 4


1st P/Kitchen 5  


2nd P/ Kitchen 1


2nd P/ Kitchen 2


2nd P/ Kitchen 3


2nd P/Kitchen 4


2nd P/ Kitchen 5


…And the winner is…hands down…2nd Period, Kitchen 4!  You guys  had the best looking, most FLUTED pie crust of the group.  Congratulations!

On a side note, I must say, I am completely impressed by ALL of the pie making.  Great job to ALL of you students!  By the way, I loved reading your comments on my previous post. 

This pie was by far the most fun and most memorable one I have done to date.  Thank you Chris (Mrs. Taylor) for including me in your curriculum.  I had such a blast doing this with you and your students! 

Who knows where this will lead me.  Maybe in a year or two I’ll be teaching my own Home Economics class of junior high students in Idaho the art of pie making!  Ha!  Now who’s up for another pie?….


Pie #49- Ginger Streusel Pumpkin December 5, 2010


This pie has a really great back story. 


This summer when my family was back East, we made a special trip to Washington DC so that our boys could see our nation’s capital.  My sister Denise lives north of the city in Maryland and we stayed with her during the time we were there. 


It just so happens that one of our favorite childhood friends, Chris Taylor, lives about an hour south of  her in Virginia.  (I also made a reference to Chris in Pie #40- Green Tomato since we both miss living in Ohio.) Anyway, she is a Home Economics teacher at Swanson Middle School in Arlington. Since it is difficult for the two of them to get together during the school year, they try to meet for lunch in the city during the summer so that they can catch up and let their kids play together.  This year, Denise planned their annual lunch at the Sculpture Garden during the time that we were visiting so that I could also see Chris and meet her kids. 


These photos below are from that day.    


When Chris heard about the Pie Project and my homemade crusts, she became very excited!  Of course most people don’t get excited about a pie blog, but Chris thought it was awesome.  (I love a good fan every now and again.)  Thus the seed was planted in her mind…somehow I was going to have to show her Home Economics students how to make a pie…


Well, got to LOVE today’s technology and Skype.  Both of us were first time users, but thanks to the help of my husband Travis and her tech support staff at Swanson, we got hooked up rather quickly and easily and the seed grew into reality.


So Friday morning at 7:00 am MNT, the pie project went LIVE and I made pie with about 50 kids from Chris Taylor’s class.  (You guys were awesome, by the way!)  Chris had pre-selected the pie and recipe I was going to make.  I made one pie the night before so that I could show the students what it actually looked like since I only had about 40 minutes of class time to demonstrate the process. The cooking time alone for this pie was close to an hour.  That is why you may notice photos with two different dates.


AND THEN, this coming Monday morning, when the kids get to school, they are dividing into small groups and are going to make this very same pie in class.  Chris will be taking photos of  her students in action and will send me the digital images so that I can post them here on the blog.  We will ALL be able to check out their culinary creations!  Can’t wait for that!  I think I will have to give out an award for most beautiful pie….


One last piece of advice to the students-  PLEASE remember to double-check your measurements, ESPECIALLY on the crust.


File:SwansonMiddle.jpg


Ginger Streusel Pumpkin Pie 
 
Ingredients:  

I pie Shell, purchased or home made 


Filling-

3 eggs

1 can (15oz) solid-pack pumpkin

1 ½ C heavy whipping cream

½ C sugar

¼ C packed brown sugar

1 ½ teaspoon salt

¼ teaspoon allspice

¼ teaspoon nutmeg

¼ teaspoon cloves 


Streusel-

1 C all-purpose flour

½ C packed brown sugar

½ C cold butter, cubed

1/3 C finely chopped crystallized ginger 
 

Directions:

Place pastry into a 9 inch pie plate.  Trim to ½ inch beyond the edge of the plate.  Flute the edges.

In large bowl whisk the eggs, pumpkin, cream, sugar and brown sugar, cinnamon, salt, allspice, nutmeg and cloves.  Pour into pastry shell. 

Bake at 350 for 40 minutes.

While the pie is baking, in a small bowl, combine flour and brown sugar, cut in butter until crumbly.  Stir in ginger.  Gently sprinkle over filling when the 40 minutes are up. 

Bake 15-25 minutes longer or until a knife inserted near the center comes out clean. Cool on a wire rack. Refrigerate leftovers.


 Source:  Taste of Home- Sonia Parvu from Sherrill, NY


Here are the photos from my pie making Skype session with the Swanson Middle Schoolers.


Personal Notes:

  • My mom’ s crust recipe is the one I used for this pie. 
  • When I made the pie on Thursday night, I ended up using my kitchenaid stand mixer.  It wasn’t necessary at all.  In fact, whisking the ingredients together like the recipe states is probably just at easy and requires very little arm power.
  • I was a little short on the crystallized ginger (about 1/4 cup instead of 1/3) but it wasn’t a big deal.  The topping was still pretty amazing.
  • LOVED the taste of this pie.  Wow!  It was much better than the average pumpkin pie.  The crumb topping was so yummy and crunchy.  A perfect 10!
  • Thanks for the recipe Chris and for the wonderful opportunity to spread the love of home-made pie to your class! XOXOXOXO
 

Pie # 48- Butterscotch Pecan December 2, 2010

 So catching up from last week’s pie…during Thanksgiving week. 

I was the self-proclaimed maker of pies during the big holiday of feasting.  My plan was to bake three pies for Thursday’s holiday- the apple cranberry (pie #46), a homemade pumpkin (not Libby’s from the can, but pumpkin harvested from a pie baking pumpkin) and this butterscotch pecan pie. 

Tuesday afternoon, I received a photo and text message from my friend Alyssa.  (I showed her how to make a pie crust when I made Pie #42- Apple Crumb Top.)  She was at home trying to make my Mom’s pie crust for her Thanksgiving pie and was getting very frustrated because something was going wrong.   Her crust was not forming into a ball.  This is the photo she sent me. 

On Wednesday morning I made my first pie crust “service call” and went to her house to help her figure out what went wrong.  It turns out she mis-read the amount needed for the flour (she put in too much) which is why the crust was crumbly. 

Here are some photos of making pie crusts at her house.


Now the butterscotch pecan recipe.  For this one, I once again consulted my go-to cookbook  Pie by Ken Haedrich. 


 Back at home now, here are the photos of making the butterscotch pecan filling.

Alyssa sent me this photo of her butterscotch pecan pie (below) later that day.  Looks good, nice job!

 Thanksgiving dessert at my brother and sister-in-laws.


Personal Notes:

  • You guessed it, I substituted my Mom’s pie crust in again for the basic flaky crust that Ken recommends.
  • Thanks so much to Edie for being the official photographer during my time making pies with your Mom and to Emme for being such a great little helper.
  • Everybody makes mistakes…my turn now.  I actually mis-read this recipe and added a WHOLE stick of butter instead of a half.  It was too late when I realized my screw up and I did not have enough butterscotch chips to start over, so I carried on and hoped for the best.  Fortunately, the mistake did not seem to affect the taste, it only doubled the amount of fat calories that ended up on my back-side from eating multiple pieces of this pie.
  • Up until this point, I have never been a huge fan of pecan pie.  But this one, I LOVED!  It was so SWEET and delicious…I tried, but I could not stop the fork from going back for more.
  • Another 10 shows up on my rating scale.


Pie #47- Sweet Potato November 24, 2010

Filed under: 2010 Pie Project,Pie #47- Sweet Potato,Sweet Pies — paulaspieproject @ 7:23 am
Tags: , ,

So I have always wanted to try a sweet potato pie, not because I am in love with sweet potatoes, but truly out of pure curiosity.  Being this close to Thanksgiving, I thought I would try one to start embracing the spirit of the holiday.

Living in Idaho, one would expect that we love our potatoes out here.   We have a restaurant in town called the Boise Fry Company that specializes in serving potatoes as the main course with burgers that come as the side.  At the Boise Fry Company you chose your potato- russet, gold, white, sweet, yam, purple or okinowa.  Then you chose your cut- regular, home-style, curly, shoestring or po’balls.  It is quite a novelty and if you ever make it out here to visit us, that restaurant would be first on our list and followed by dessert at the West Side Drive-In for a serving of the Idaho ice cream potato. Double yum!!

Anyway, I can honestly say I remember sweet potatoes (a.k.a. yams) being pretty gross as a kid.  My mom used to make a sweet potato casserole loaded with marshmallows on it, and it still tasted nasty.  But it wasn’t until my sister-in-law, Dalia, gave me another sweet potato recipe some years back that I have actually embraced the taste of these orange tuberous roots.  I willingly admit, that particular recipe and the one for the pie that follows is loaded with lots of butter and brown sugar.  Now, yams never tasted so good…..

Here is the link to the recipe if you want to read the reviews.

http://allrecipes.com/Recipe/Sweet-Potato-Pie-II-2/Detail.aspx

Sweet Potato Pie


 Ingredients:

2 cups mashed sweet potatoes
1/4 pound butter, softened
2 eggs, separated
1 cup packed brown sugar
1/4 teaspoon salt
1/2 teaspoon ground ginger
1/2 teaspoon ground cinnamon
1/2 teaspoon ground nutmeg
1/2 cup evaporated milk
1/4 cup white sugar
1 (9 inch) unbaked pie crust
 

Directions:

1.
Preheat oven to 400 degrees F (200 degrees C).
2.
In a mixing bowl, combine the sweet potatoes, butter, egg yolks, brown sugar, salt, ginger, cinnamon, nutmeg and evaporated milk. Mix together well.
3.
Beat egg whites until stiff peaks form; add 1/4 cup sugar and fold into sweet potato mixture.
4.
Pour into pie shell and bake at 400 degrees F (200 degrees C) for 10 minutes. Reduce heat and bake at 350 degrees F (175 degrees C) for 30 minutes or until firm


Personal Notes:

  • Yes, it looks like pumpkin pie and tastes like pumpkin pie.  Oh my, gotta try!  And like Pie #38- Zucchini Pie which tasted just like apple pie, this sweet potato pie will have your Thanksgiving guests thinking it is pumpkin. The only difference was the texture of this pie was a little more course than the pumpkin.
  • Ok, I admit, my sweet potatoes came from a can.  I did not bake them.  The sin of it!
  • I used my Mom’s pie crust recipe (as if you didn’t figure that one out).
  • My rating- a solid 9.  Delicious!


Pie #46- Apple Cranberry November 15, 2010

Good morning class….and now for a little shout out to Chris Taylor’s home economics classes at Swanson Middle School in Virginia… Thanks for reading my blog!  I can’t wait to teach all of  YOU how to make your own pies!

I am not sure if any of you read the comments-portion of my posts (Travis always has something witty to say), but recently my friend Jacqui took on the pie making challenge and added a couple of comments to the posts.  She made Pie #40- Green Tomato and then the next day pumped out Pie #6- Pear Pie.  I am so proud of her!  This is the photo she shared with me of  HER green tomato pie.  Yeah, Jacqui!  It’s beautiful!!!

And now on to the recipe for this new pie…. Thanks to Theresa for passing this on to me.  I knew it would be the perfect one to try near Thanksgiving since cranberries are now fresh and available in the grocery stores.  I passed on the stuffing and cooking of the bird this year and appointed myself to make the pies for our big feast.  If all goes well and no one croaks after consumption, I plan to make this one again for Turkey Day since my sister-in-law (who is hosting our meal) really loves apple pie.

And another thing….. my friend Greg (He’s the one who gave me the recipe for Pie #16- Rhubarb Cream Cheese) asked me last night which crust recipe I liked best.  My immediate response was my Mom’s (Jan Mom’s pie pastry) recipe since  it is tasty, easy to make and I now know it like the back of my hand.  But he brought up the vodka infused crust recipe that I used with Pie #28- Blueberry.  Oh, yes, that WAS a fantastic crust recipe!  And I haven’t made it for quite a while, so I decided to make it tonight with this pie.  Once again it did not disappoint.  

APPLE CRANBERRY PIE

Makes one 9-inch pie.   Published November 1, 2007.   From Cook’s Illustrated.
Use sweet, crisp apples, such as Golden Delicious, Jonagold, Fuji, or Braeburn. The two fillings can be made ahead, cooled, and stored separately in the refrigerator for up to 2 days.

INGREDIENTS
2 cups fresh or frozen cranberries
1/4 cup orange juice
1 cup granulated sugar (7 ounces) plus 1 tablespoon for top of pie
1/2 teaspoon ground cinnamon
1/2 teaspoon table salt
1/4 cup water
1 tablespoon cornstarch
3 1/ sweet apples (6 to 7 medium), peeled, cored, and cut into 1/4-inch-thick slices (see note above)
1 recipe pie dough (see related recipe)
1 egg white , beaten lightly

INSTRUCTIONS
1. Bring cranberries, juice, 1/2 cup sugar, 1/4 teaspoon cinnamon, and 1/4 teaspoon salt to boil in medium saucepan over medium-high heat. Cook, stirring occasionally and pressing berries against side of pot, until berries have completely broken down and juices have thickened to jamlike consistency (wooden spoon scraped across bottom should leave clear trail that doesn’t fill in), 10 to 12 minutes. Remove from heat, stir in water, and cool to room temperature, about 30 minutes.
2. Meanwhile, mix 1/2 cup sugar, remaining 1/4 teaspoon cinnamon, remaining 1/4 teaspoon salt, and cornstarch in large microwave-safe bowl; add apples and toss to combine. Microwave on high power, stirring with rubber spatula every 3 minutes, until apples are just starting to turn translucent around edges and liquid is thick and glossy, 10 to 14 minutes. Cool to room temperature, about 30 minutes.
3. While fillings cool, adjust oven rack to lowest position, place rimmed baking sheet on oven rack, and heat oven to 425 degrees. Remove 1 disk of dough from refrigerator and roll out on generously floured (up to 1/4 cup) work surface to 12-inch circle about 1/8 inch thick. Roll dough loosely around rolling pin and unroll into pie plate, leaving at least 1-inch overhang. Ease dough into plate by gently lifting edge of dough with one hand while pressing into plate bottom with other hand. Leave dough that overhangs plate in place; refrigerate until dough is firm, about 30 minutes.
4. Transfer cooled cranberry mixture to dough-lined pie plate and spread into even layer. Place apple mixture on top of cranberries, mounding slightly in center; push down any sharp apple edges.
5. Roll second disk of dough on generously floured work surface (up to 1/4 cup) to 12-inch circle about 1/8 inch thick. Roll dough loosely around rolling pin and unroll over pie, leaving at least 1-inch overhang on each side.
6. Using kitchen shears, cut evenly through both layers of overhanging dough, leaving 1/2-inch overhang. Fold dough under itself so that edge of fold is flush with outer rim of pie plate. Flute edges using thumb and forefinger or press with tines of fork to seal. Brush top and edges of pie with egg white and sprinkle with remaining tablespoon sugar. Using sharp paring knife, cut four 1 1/2-inch slits in top of dough in cross pattern.
7. Place pie on preheated baking sheet and bake until top is light golden brown, 20 to 25 minutes. Reduce oven temperature to 375 degrees, rotate baking sheet, and continue to bake until crust is deep golden brown, 25 to 30 minutes longer. Transfer pie to wire rack to cool at least 2 hours. Cut into wedges and serve.

 PIE PASTRY RECIPE  

Makes one 9-inch pie.   Published July 1, 2008.   From Cook’s Illustrated.

INGREDIENTS
2- 1/2 cups all-purpose flour
1 teaspoon salt
2 tablespoons sugar 
12  tablespoons cold unsalted butter, cut into 1/4-inch slices
1/2 cup vegetable shortening, cold cut into 4 pieces
1/4 cup vodka
1/4 cup water

INSTRUCTIONS
1. Process 1-1/2 cups flour, salt and sugar in food processor until combined.  Add butter and shortening and process until dough starts to collect in uneven clumps, about 15 seconds.  Scrape bowl with spatula and redistribute dough evenly around processor blade.  Add remaining cup of flour and pulse until mixture is evenly distributed around bowl.  Empty into medium bowl.

2. Sprinkle vodka and water over mixture.  Use folding motion to mix, pressing down until dough is slightly tacky and sticks together.  Divide into 2 even balls and flatten each into 4 inch disks. Wrap in plastic wrap and refrigerate.

3. Remove 1 disk from refrigerator and roll out onto generously floured surface.  Carefully place rolled dough into pie plate.  Roll out disk 2. 


 Personal Notes

  • I used Braeburn apples and fresh cranberries for this pie. 
  • The crust was amazing!  I’ll say it again, the crust was amazing!!!  The alcohol cooks out of the pastry during the baking process and there is no hint of vodka left as you bite into the crust.  Whatever chemical reaction the vodka has with the pastry concoction, it sure does it right.  This crust is  light, flaky and extremely tasty.  I promise you if your read Travis’ comments he will find the perfect words to describe how delicious it was. 
  • I did not keep the dough in the refrigerator very long like the directions suggest.  I like my dough warmer because I think it is easier to roll out.
  • The cranberry twist to this apple pie recipe is the perfect thing to help kick off the holidays.  Happy Thanksgiving everyone!
  • And now I am too tired to write anything else.  I look at this again in the morning and add more if it is noteworthy.


Pie #45- Snickers Candy Bar November 8, 2010

I don’t know about anyone else, but the children here at my house are recovering from the amazing sugar high that has lasted all week.  My boys have finally gotten to the bottom of their Halloween candy (Thank God!) and are now going into complete corn syrup withdraw.  Good thing I was well prepared and had them give me all of their snickers candy bars the night of Halloween, otherwise I would have had to come up with a new name for this pie.  

Also, this year I had some unbelievable will power going on.  Normally, I eat all the chocolate candy I can get my hands on, but on Halloween night I only had one piece of taffy.  And that’s been it all week!  Needless to say, I’ve been looking forward to this candy (my favorite) infused pie since last Sunday…yum!

So I have to give a little shout out to my former high school classmate, Jennifer Beard Storey, who I haven’t seen in….hmmm…twenty something years.  Gotta love Facebook.  It was there she found out about my pie blog and unbelievably finds it interesting enough to read.  Anyway, thanks Jennifer for the recipe and your contribution to the project.  Someday, I need to introduce my four young lads to your four little beauties!!!

Alice’s Brady Bunch Cookbook.   
“Jan’s Nothing To Snicker at Snickers Pie”
 INGREDIENTS
  • 1 1/2 cups graham cracker crumbs (about 15 whole crackers) 
  • 1 Tbl plus 2 tsp sugar
  • 6 Tbl unsalted butter, melted
  • 5 regular snickers bars
  • 1 3 oz package of chocolate pudding & pie filling mix
  • 1 cup heavy or whipping cream (I’ve also used cool whip)
 INSTRUCTIONS
  • Butter an 8″ in pie plate.  In a medium bowl combine the graham cracker crumbs and 1 Tbls of sugar.  Stir in melted butter until well combined.  Press the crumb mixture into the bottom of the pie dish.  Bake at 350 for 5-8 min or until set.  Cool completely.
  • Cut 4 snickers bars in half lengthwise and then into small 1/4 in pieces crosswise.  Sprinkle the pieces on the bottom of the crust.
  • Prepare the pudding mix according to the package directions for pie filling.  Spoon the filling over the snickers in the pice shell.  Cover w/plastic wrap and refrigerate for 3 hours.
  • Just before serving , in a small bowl beat the heavy cream w/the remaining 2 tsps of sugar with a mixer at high-speed until stiff peaks form.  Cut the remaining Snickers bar into pieces.  Cut the pie into slices and garnish each slice with a dollop of whipped cream and candy bar pieces. 


Personal Notes:

  • Ok it is week 45 out of 52 and at this point I can boast I am pretty good at making a pie crust out of flour. But my dirty little secret is that when it comes to a graham cracker crust, I suck.  The ones I have previously made have always completely fallen apart.  Up until this week’s crust, it finally worked!!!   I must have had that right amount of butter to graham cracker ratio.  The crust hardened when I baked it and then when I cut it, it actually stayed in true triangle pie slice form.  Thank you again, Jennifer for sharing Alice’s Brady Bunch’s cookbook recipe.  I can now raise my head high!
  • Easy. Easy. Easy.  In terms of ease of assembly, this pie tops the charts and ends up tied with Pie #19- Banana Split.  Seriously, quick and easy.  Not even an easy-bake oven is necessary.
  • Henry liked it.  (I keep thinking of that Life cereal commercial that used to run when we were young with the quote…”Mikey, he likes it.” )  Henry, he likes it!  (Wish I would have thought quick enough to photograph the moment.) This is now only the second pie he has actually liked and consumed…the other one was the banana split pie…go figure!?  Simple is best must be his mantra.
  • Ok, as for my opinion, the taste was not complex…it was chocolate pudding for goodness sake.  I loved my successful graham cracker crust and the bits of snickers candy bar and oh yeah, the fresh whipping cream.  AND of course I loved the fact I spent maybe fifteen whole minutes on the entire pie assembly and that my kids devoured it…..I’ll definitely make it again.